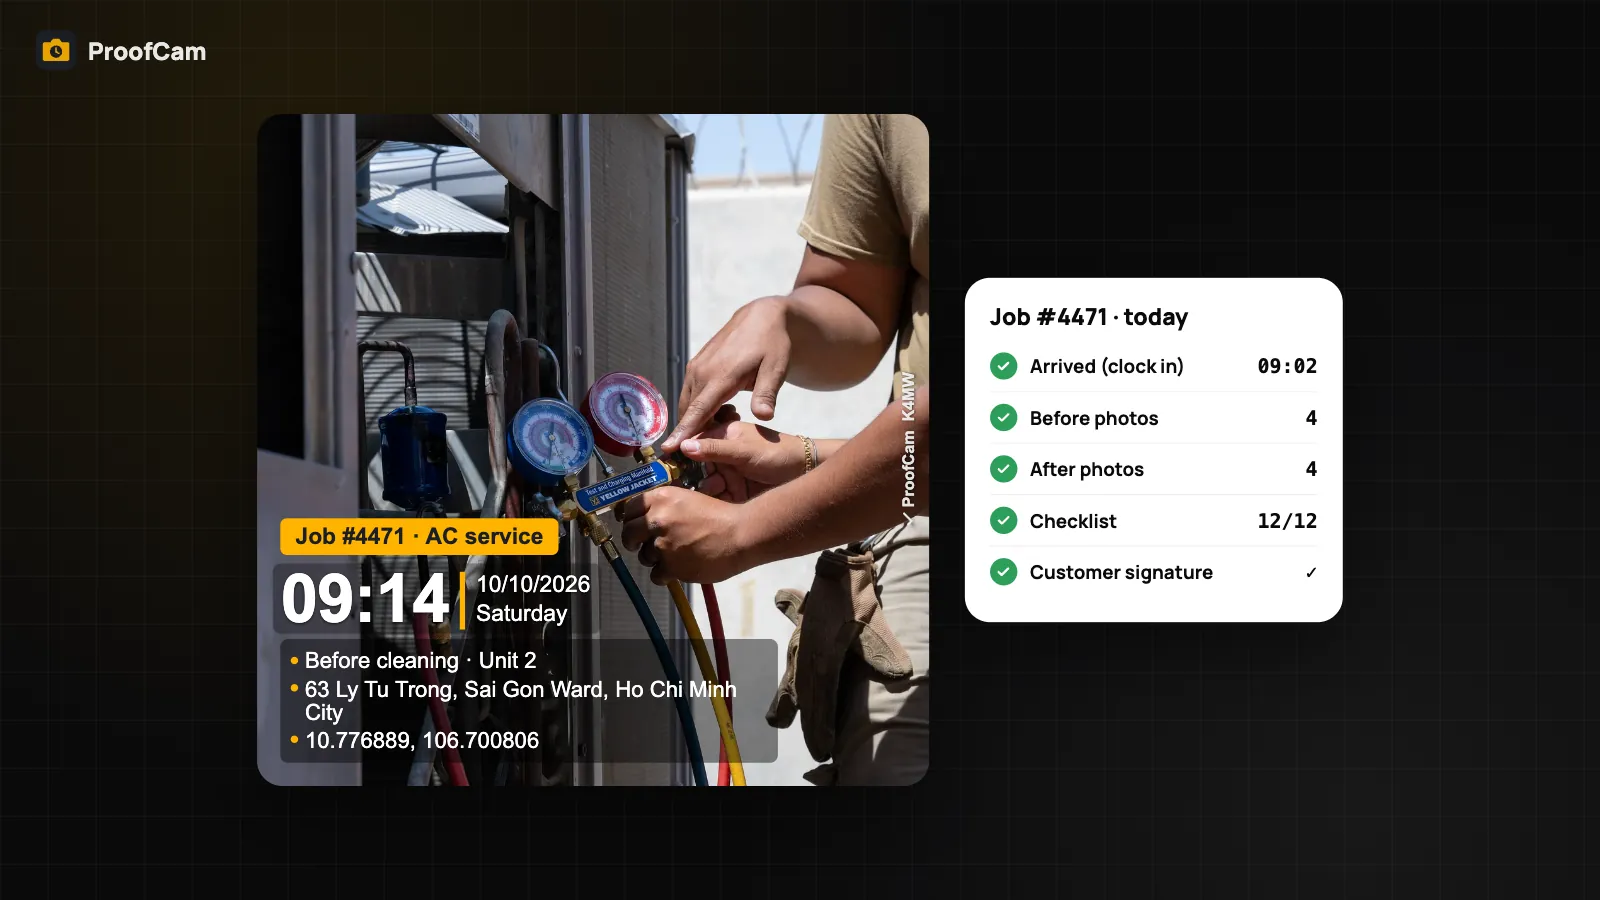
A technician cleans four split units in an office, tops up refrigerant on one, and leaves. Three weeks later the customer calls: "Unit 2 was never serviced, and now it's leaking." Without good HVAC job photos, it's your word against theirs. The same goes for the plumber who replaced a valve under a sink, or the electrician who tightened a terminal in a distribution board. This guide shows how small service companies and independent technicians can use ProofCam to capture before/after photos, equipment serials, readings and a customer signature, and turn them into a service report on the spot.
It's written for HVAC, plumbing and electrical work, but the workflow fits most call-out and maintenance-contract jobs.
Where service paperwork falls apart
- "You never touched it." Disputes about whether a unit was cleaned, a filter replaced or a leak fixed. A photo without a reliable time and place doesn't settle much.
- Serial numbers copied by hand. Nameplates are small, dirty and in awkward places. One wrong digit and the warranty claim or the asset register is wrong.
- Readings on scraps of paper. Pressures, temperatures and test values written on a glove or a job sheet that gets wet in the van.
- Photos lost in chat apps. Forty jobs a week, each technician sending photos to a different group, compressed and without context.
- No signal where the work is. Plant rooms, basements, ceiling voids and risers rarely have mobile data.
Which ProofCam features help with HVAC job photos
| Need | ProofCam feature | Plan |
|---|---|---|
| Stamped photos with network time, GPS, address, job number and notes | Timestamp camera + custom fields ("Job #", "Unit", "Customer") | Free (3 custom fields), Plus (10) |
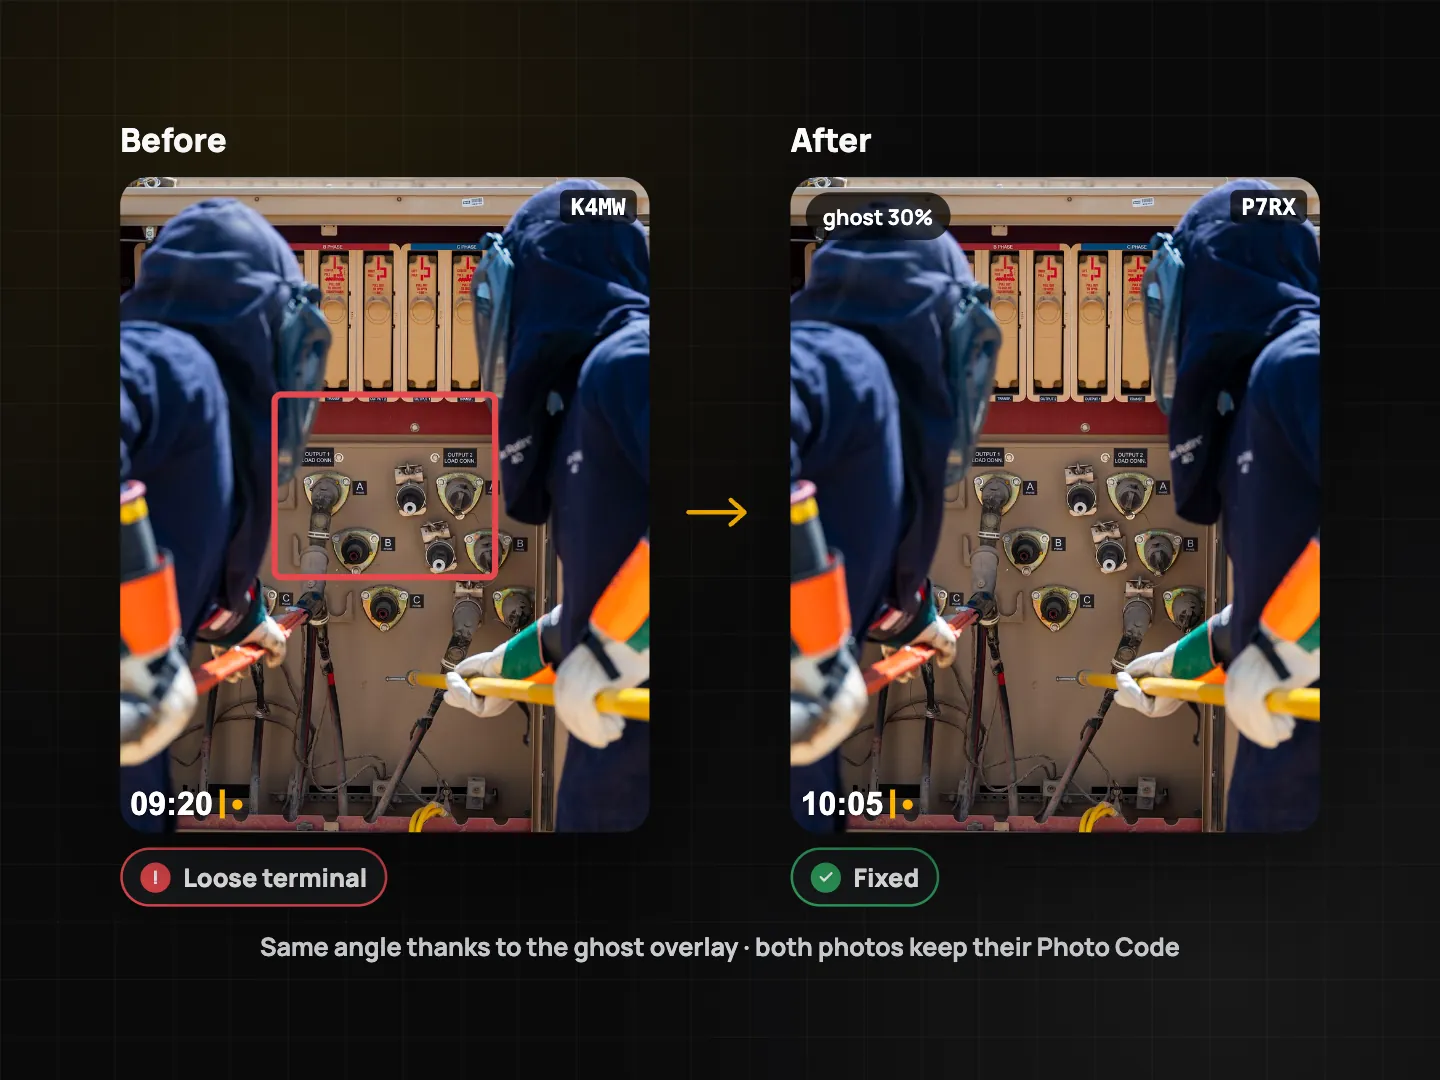
| After photo from the same angle as the before | Tasks with 30% ghost overlay of the before photo | Teamspace team |
| Compare before and after | Comparison slider in photo details; before/after collage | Slider Free, collage Plus |
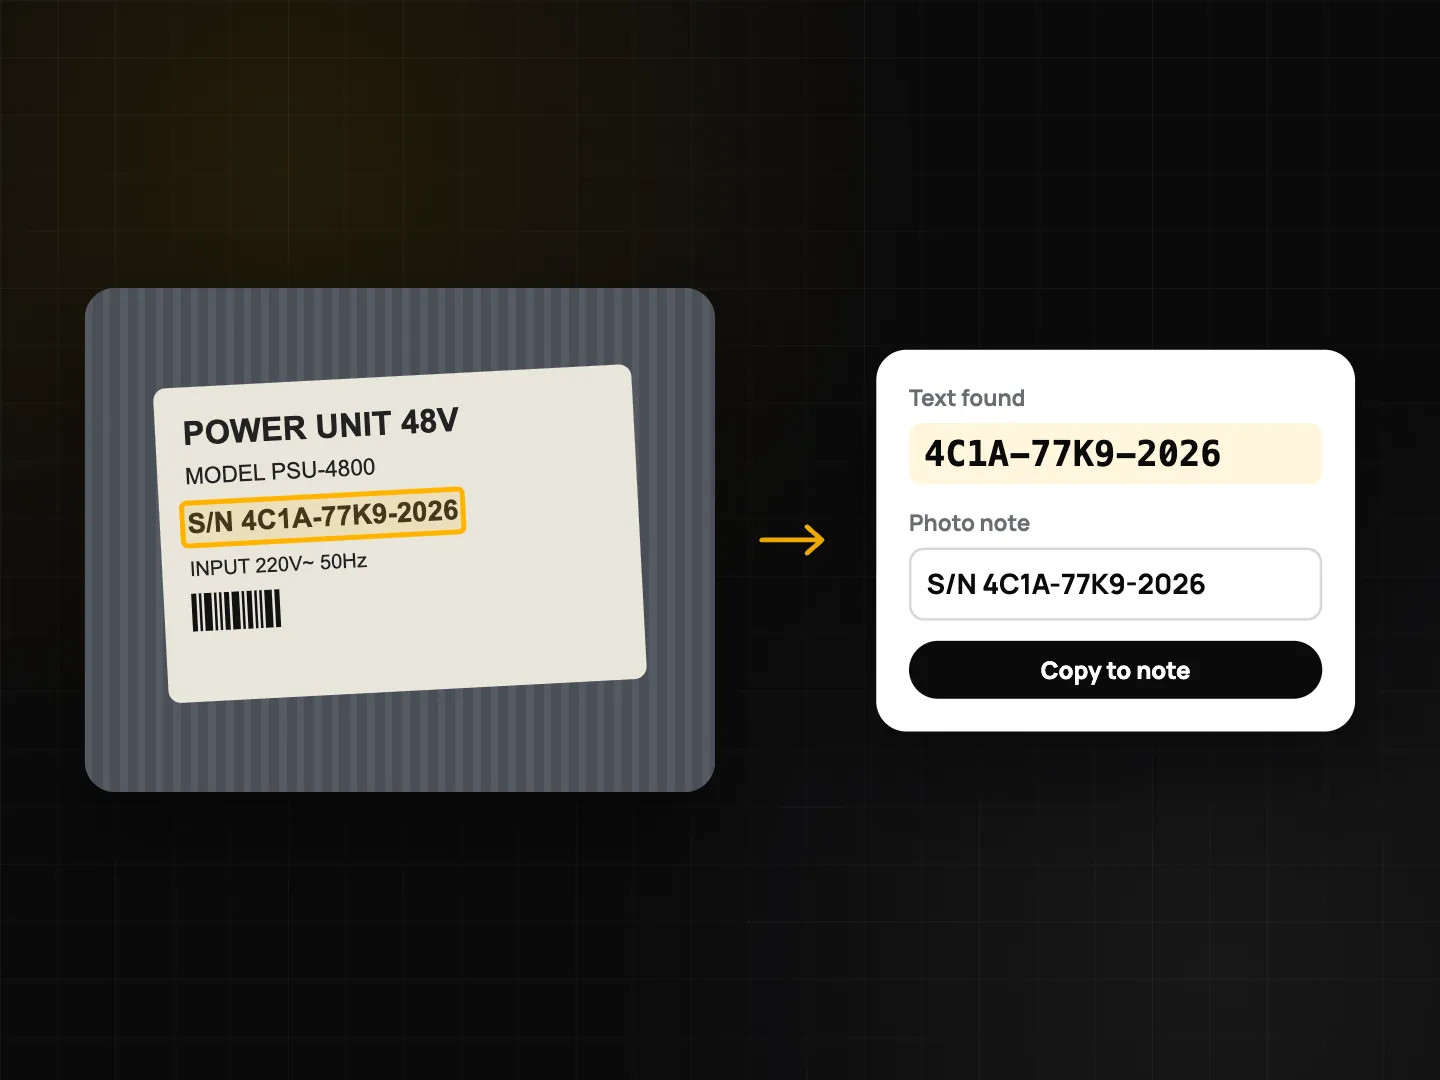
| Read a serial number from a nameplate | On-device text recognition, copied into the photo note | Free from a photo's details; OCR in document mode is Plus |
| Readings from your own gauges and meters | Checklist number questions with unit and min/max | Free (1 template), Plus (unlimited) |
| Indicative noise or vibration level of a unit | Field meters (sound dBA, vibration, light), stamped on the photo | Plus or Business team |
| Dark ceiling voids and plant rooms | Night/HDR | Plus |
| Scan a signed paper service form | Document mode, Photo Code per page | Plus |
| Customer sign-off | Signature question in the checklist | Free |
| Branded PDF service report | Report builder with logo and brand colour | Plus or Business team |
| Arrival and departure per job | Clock in / out with a stamped photo | Free |
| Work in basements without data | Offline capture + Sync center | Free |
An important limit: ProofCam doesn't measure refrigerant pressure, temperature, voltage or insulation resistance. Those values come from your own instruments. You type them into a checklist and photograph the instrument display next to the entry, so the number and the evidence travel together.
Step-by-step workflow for a service job
Setup (once)
- Create a watermark template from the Work Record preset. Add custom fields like "Job #", "Unit" and "Customer site". Custom fields can also go into file names, so exported photos sort by job. See watermark templates.
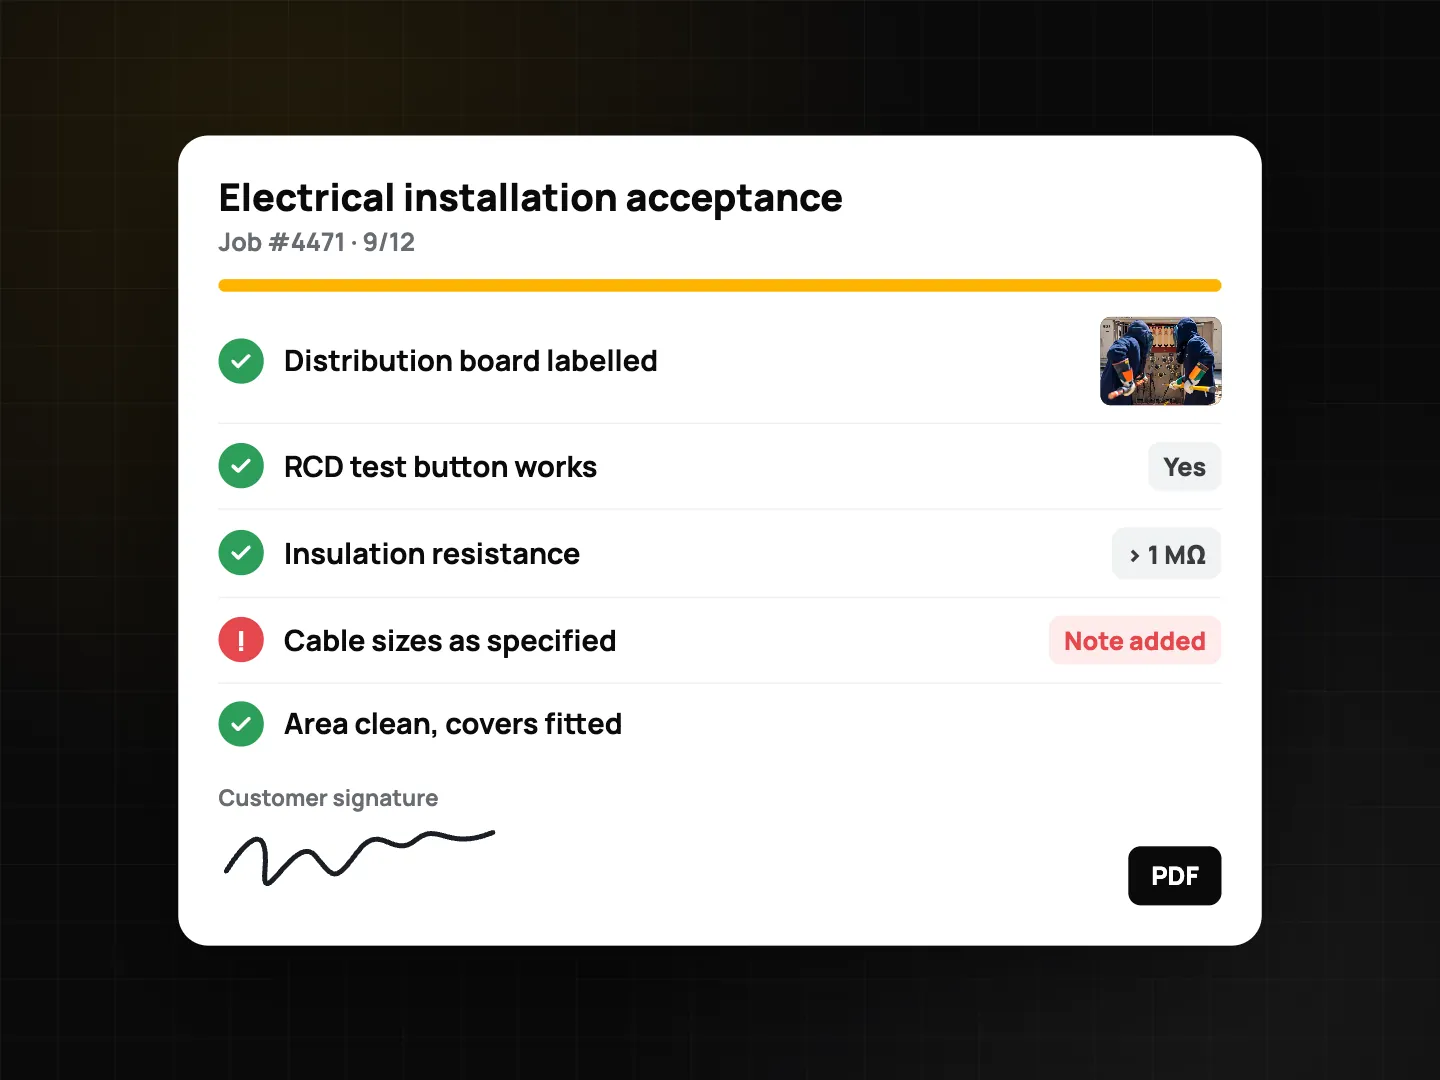
- Build or install a checklist. Teams can install the starter template "Electrical installation acceptance"; for HVAC, create a "Split unit service" checklist (see the template below). Have a paper job sheet? Form import (Plus) turns a photo or PDF of it into a draft checklist.
- For a team, set up a Teamspace project per contract or customer site with its address and a geofence, and publish the template as a team template.
On site
- Clock in with a stamped photo when you arrive. The time clock shows arrival and departure for each job; see photo clock-in.
- Shoot the before photos: the unit, the filter, the drain pan, the panel with the cover off. Note the problem on the stamp ("Unit 2 · coil dirty · drain blocked").
- Photograph the nameplate and use text recognition to copy the model and serial number into the note. Check confusable characters like 0/O and 1/I.
- Log faults as tasks. In a team, create a task from the before photo. When the fix is done, the after photo is taken over a 30% ghost of the before, so it's the same terminal, the same valve, the same angle. If the after photo is more than 50 m (team setting) from the before, the reviewer sees a red warning. Details in punch lists with before/after photos.
- Record readings in the checklist. Use number questions with unit and min/max, for example suction pressure in bar or insulation resistance in MΩ, and add a photo of the gauge or tester display.
- Noisy outdoor unit or vibrating fan? With Plus or a Business team, the field meters stamp an estimated sound level (10 s Leq + max) or vibration reading on the photo. These are indicative phone readings, not certified measurements.
- Dark ceiling void? Night/HDR (Plus) helps get a usable photo of a hidden coil or junction box.
- No signal? Keep going. Photos, checklists and signatures save on the phone and sync later.
Before you leave
- Get the customer's signature on screen in the checklist.
- Generate the PDF. The checklist PDF has a cover, all answers, photos with Photo Codes, a signature page and a verify QR. With Plus or a Business team, the report builder adds your logo, brand colour and 1, 2 or 4 photos per page; Quick PDF report turns selected photos into a report in one tap.
- If the customer signs a paper form, scan it with document mode (Plus); each page gets its own Photo Code.
- Clock out, and send the PDF or a share link.
Service checklist template (split unit service)
| Item | Question type |
|---|---|
| Unit location and tag | Text + photo |
| Model and serial number | Text (copied from the nameplate via text recognition) + photo |
| Filter condition before cleaning | Single choice (Clean / Dirty / Replaced) + photo |
| Coil and drain pan cleaned | Yes / No + required photo (min. 2) |
| Drain test passed | Yes / No / N/A |
| Suction pressure from your gauge | Number with unit (bar) and min/max + photo of gauge |
| Supply air temperature from your thermometer | Number with unit (°C) |
| Noise or vibration complaint | Yes / No (conditional: field meter photo) |
| Refrigerant added | Number with unit (kg), N/A allowed |
| Remarks for the customer | Text |
| Customer signature | Signature |
For plumbing jobs, swap the HVAC items for "Leak location", "Part replaced" (photo of old and new part), "Pressure test value from your gauge" and "Water off/on time". Turn on scoring if you want a pass/fail summary on the PDF cover; flagged items can create tasks automatically in a team.
A note on regulated work: electrical, gas and refrigerant work must follow local codes, licensing and certification rules. ProofCam helps document what was done; it doesn't replace the required test certificates or a licensed professional's sign-off.
Tips
- Same angle, every time. Before and after photos are only convincing if they show the same thing. The ghost overlay does this for you.
- Photograph the instrument, not just the number. A gauge photo next to the typed reading makes the record much stronger.
- Keep notes short: unit, location, action. Search covers notes, tags and recognized text, so typing part of a serial number finds the nameplate later.
- Recurring maintenance contracts: one project per customer site keeps every visit's photos and checklists together.
Doing similar work in buildings? See the building maintenance work order app guide, or solar installation photo documentation for PV installers.
FAQ
Can ProofCam measure refrigerant pressure or voltage?
No. ProofCam doesn't read gauges or testers. You type the values from your own instruments into checklist number questions and add a photo of the display. Only the phone-based field meters (sound, vibration, light) are measured by ProofCam, and they're labelled as estimates.
Does it work in basements and plant rooms without signal?
Yes. Photos, checklists, signatures and PDFs work offline, and Photo Codes come from a pool on the phone. Team uploads wait in the Sync center until there's a connection.
Can the customer check that the photos weren't edited?
Yes. Each photo has a Photo Code, and the checklist PDF includes a verify QR. Photos forwarded through chat apps are recompressed and show as a "Modified copy", which is expected; the code still points to the original record.
Do I need a team plan as a one-person business?
No. A solo technician can use the camera, checklists and PDFs alone, and Plus adds unlimited checklists, the report builder, Night/HDR and document mode. Tasks with the ghost overlay need a Teamspace team.
Related: inspection checklists and PDF reports and offline photo proof.